
Sharing is Caring
- You are here:
- Home »
- Blog »
- Blog
- » How to Make Homemade Tire Sealant

How to Make Homemade Tire Sealant
Do you still have a tubed tired bicycle? What do you do when it got flat? Do you buy a sealant or do you go to the bike shop? For small holes, it's super easy and cheap to make your own homemade tire sealant.
Despite the presence of tubeless tires, there are still bicycle lovers who are getting the tubed tire bikes because they just have used to go biking with those types. However,regardless of the type of tires they get, they will be needing sealants in case they had their tires flattened.
There have been a lot of conventional tire sealants which can be bought in different sports centers around the area. However, it is important that we are also equipped with homemade-ing skills to be able to save more money and time.
To help you start with the do-it-your-own (DIY) projects, here are some of the recipes to homemade tire sealants.
How to Make Homemade Tire Sealant to Save Your Tire from Retiring
1. Basic DIY Tire Sealant
This ingredient of a homebrewed do it your own tire sealant is used only for flat tires that can be taped easily. For example, if the cause of the flat tire was only as simple as the needle in syringe, then this DIY ingredient might work. In case the use of a water-based glue won’t work in the situation, then it is advisable to check on the more heavy duty ingredient provided after this procedure.
Materials
- Water
- Water-based Glue (like Elmer’s Glue)
- Glitter or Rubber Dust (preferably larged size and in black color)
- Bottle with a fine nozzle (like the kitten’s drinking bottles)
- Tubed bike tire
The amount of the materials to be used depends on the size of the bottle that you have, and depends on the quantity of sealant that you need. Be careful not to prepared too much sealant, and only mix those that you will be using because it might dry up. If sealants dry up, it can no longer be used to fix flat tires, and to seal tubed bicycle tires.
Procedure
- Step 1: Make the glue and water mixture.Mix the glue with the water, put it in the bottle where you will be making the sealant.
- Step 2: Put the glitter or dust.Add the glitter or the rubber dust in the mixture and shape until the texture feels like the conventional sealant.
Via LovelyPursuits.com
- Step 3: Check the texture.If the mixture looks super sticky, then it is now ready to be used in as tire sealant on your flat-tired bicycle.
Here is a YouTube Video to keep you guided:
2. Heavy Duty Homemade Tire Sealant
In case you have encountered a really bad situation and you seriously need a heavy duty tire sealant, then this set of ingredients can get you off the trouble. As it can be seen in the materials needed for this type of sealant are really different because it is not as accessible as the materials used in such simple sealant.
To help you out, these materials are available for online franchise to avoid having your time consumed for looking into it. It is suggested to take a look first on the brands before going to stores to know if it is available or not.
Materials
- Latex Mold Builder
- Glycol Based Antifreeze
- Automotive Slime
- Water
- Glitter or Rubber Dust (preferably larged size and in black or dark color)
- Bottle with a fine nozzle (like the kitten’s drinking bottles)
- Tubed bike tire
Procedure
- Step 1: Get all the materials.Prepare the materials on the following amount: 16 oz Latex Mold Builder, 16 oz Glycol Based Antifreeze, 16 oz Automotive Slime, 32 oz of water, and 1 oz of glitter or rubber dust that is preferably on the largest size possible, and in dark color so it won’t be an eyesore on your tire.
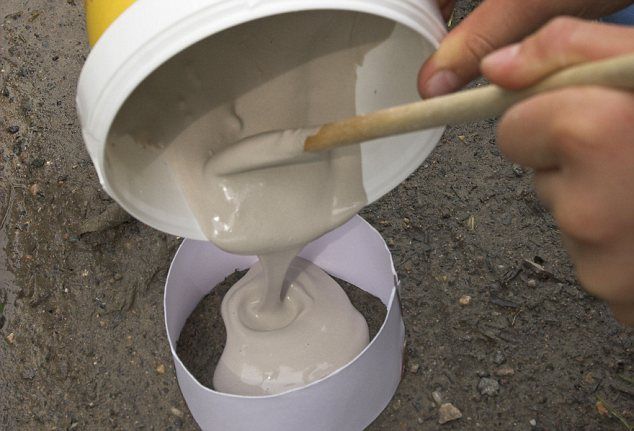
- Step 2: Mix the materials in one plate.Get a flat container where you can put all the materials together, and get a stick or an old brush to mix it. When you notice that the texture is already sticky like the conventional sealant, then put the mixture on the bottle.
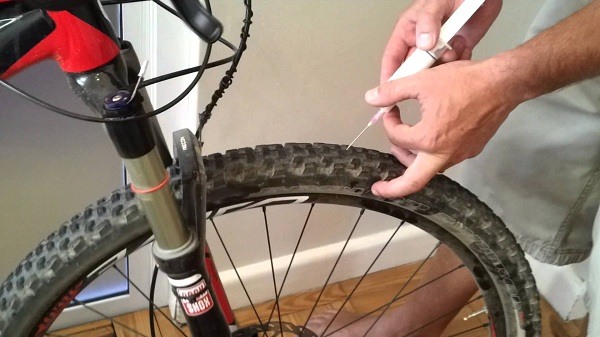
- Step 3: Apply the sealant to the tire.Through the nozzle of the bottle, apply the homemade sealant directly on the holes of your tubed-tire. Let it dry up for a while before using it again to make sure that the sealant was able to seal the damage.
Pro Tips
- Making homemade sealant is easy given the ingredients and procedures explained above. However, it is advisable to make sure that you mix only the amount that you need because sealant dries up easily. To avoid throwing away the unused sealant, you can also try collecting things that need sealant so you can put the excess mixture on it.
- Make sure that you are properly dressed when doing a homemade sealant. You will be working with sticky materials which can grease up your clothes so stay rugged as possible. Also, tie your hair up to make sure that no sealant will stick on the strands of your hair.
- In case materials have accidentally poured, use milk to clean the mess. Clean the mixture as early as possible to avoid additional cleaning duties.
We do not need to spend a lot in buying conventional first aids in case we were in an unnecessary situation with our bicycles. To be able to have more savings and to avoid buying too much in the stores, then you can definitely try these recipes at home.
n case you have more ideas on doing homemade tire sealants, you can send us a feedback below. For you and your friends’ reference, share this blog in Facebook and Twitter.
About the Author Nick Soros
Hi, I'm Nick Soros. I have been an cycling enthusiast from 2006. Ezroadbike.com is my personal blog where I share my pedaling experience. No matter you are a new cyclist or skillful one, you would find useful topics in my site. Have a great cycling...